AFB Flaring & Swagging Tool Set
model: CT-275
| Specifications | Details |
| Brand | Asian First brand |
| Model | CT-275 |
| Tool Type | 45° Flaring & Swaging Tool Kit |
| Tubing Materials | Soft copper, brass, aluminum |
| Flaring Sizes | 1/8″, 3/16″, 1/4″, 5/16″, 3/8″, 7/16″, 1/2″, 5/8″, 3/4″ O.D. |
| Swaging Sizes | 3/16″, 1/4″, 5/16″, 3/8″, 1/2″, 5/8″, 3/4″ |
| Construction | Hardened steel, chrome-finished cone/adapters |
| Yoke Type | Slip-on forged steel yoke |
| Feed Mechanism | Screw-type feed |
| Application | HVAC, refrigeration, automotive tubing |
The Asian First Flaring & Swagging Tool Set CT-275 is a refrigeration and HVAC tubing tool kit used for flaring and swaging soft metal tubes such as copper, brass, and aluminum. It is commonly used in:
Air-conditioning installation
Refrigeration servicing
HVAC pipe connection work
Automotive brake/fuel line tubing
Plumbing tube expansion and joining
Main Uses
Flaring
Expands the tube end into a 45° flare for flare-nut connections.
Used in split-type aircon copper piping and refrigeration lines.
Swaging (Swagging)
Enlarges one tube end so another tube can fit inside it for brazing/soldering.
Helps reduce fittings and joints in copper line installation.
Tube Repair & Maintenance
Used during leak repair, compressor replacement, line extension, and HVAC maintenance.
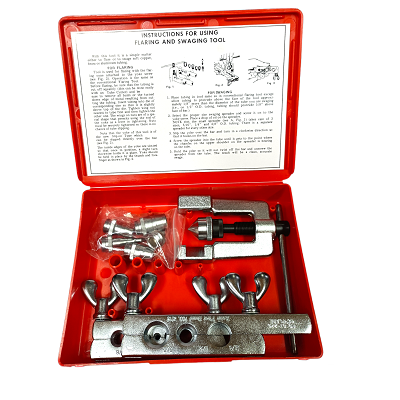
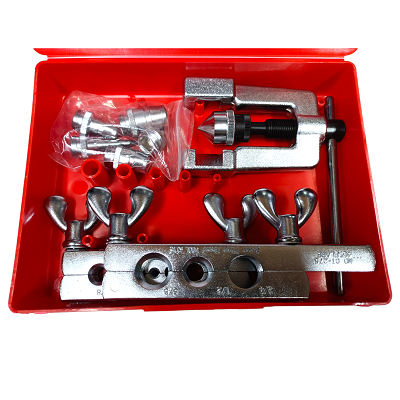
The kit usually includes:
- Flaring bar
- Slip-on yoke
- Swaging adapters
- Flaring cone
- Carrying case
How It Works
- Clamp the tube in the proper die size.
- Use the cone to create a flare or the adapter to swage the tube.
- Tighten gradually using the screw mechanism.
Advantages
- Creates leak-resistant flare joints
- Ideal for close-quarter HVAC work
- Portable and manual (no power needed)
- Suitable for field technicians
Common Industries
- HVAC/R technicians
- Aircon installers
- Refrigeration mechanics
- Automotive mechanics
- Plumbing technicians
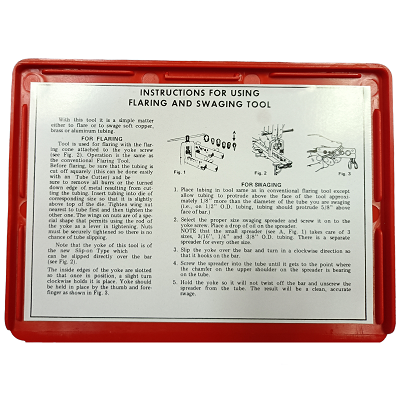
INSTRUCTION FOR USING FLARING AND SWAGGING TOOL
With this tool it is a simple matter either to flare or to swag soft copper, brass or aluminium tubing.
FOR FLARING
Tool is used for flaring with the flaring cone attached to the yoke screw (see fig 2.).
Operation is the same as the conventional Flaring tool.
Before flaring, be sure that the tubing is cut off squarely (this can be done easily with a tube cutter) and be sure to remove all burs or the turned down edge of metal resulting from cutting the tubing. Insert tubing into die of corresponding size so that it is slightly above top of the die. Tighten wing nut nearest to tube first and then tighten the other one. The wings on nuts are of a special shape that permits using the rod of the yoke as a lever in tightening. Nuts must be securely tightened so there is no chance of tube slipping.
Note that the yoke of this tool is of the new slip-on type which can be slipped directly over the bar (see fig. 2).
The inside edges of the yoke are slotted so that once in position, a slight turn clockwise holds it is place. Yoke should be held in place by the thumb and forefinger as shown in Fig. 3.
FOR SWAGGING
Place tubing in tool same as in conventional flaring tool except allow tubing to protrude above the face of the tool approximately 1/8” more than the diameter of the tube you are swagging (ie., on ½” O.D. tubing, tubing should protrude 5/8” above face of bar.)
Select the proper size swagging spreader and screw it on to the yoke screw. Place a drop of oil on the spreader for every other size.
Slip the yoke over the bar and turn in a clockwise direction so that it hooks on the bar.
Screw the spreader into the tube until it gets to the point where the chamfer on the upper shoulder on the tube.
Hold the yoke so it will not twist off the bar and unscrew the spreader from the tube. The result will be a clean, accurate swag.